Your new DC vacuum pump is installed, but the gauge stubbornly sits below your target. This roadblock can halt your entire project, leaving you frustrated. Let’s pinpoint the issue and fix it.
A vacuum pump DC fails to reach its target vacuum primarily due to air leaks in the system, a mismatch between the pump’s specifications and the application’s demands, or an inadequate power supply limiting the motor’s performance. Verifying your setup’s integrity is the crucial first step.
I’ve spent over two decades helping engineers integrate micro vacuum pumps, and this is one of the most common challenges they face. The good news is that the solution is usually found not by blaming the pump, but by examining the system around it. Let’s break down the likely culprits, one by one.
Is Your System Leaking Air and Undermining Your Vacuum?
You have a powerful pump, but it feels like it’s working against an invisible force. Your system is failing to hold a vacuum, suggesting the pump is continuously removing air that’s seeping in.
The most common reason a vacuum suction pump fails to reach its target is an air leak. Even a microscopic hole in tubing, a loose fitting, or a poor seal will constantly let atmospheric pressure in, forcing your pump to work endlessly without ever reaching its goal.
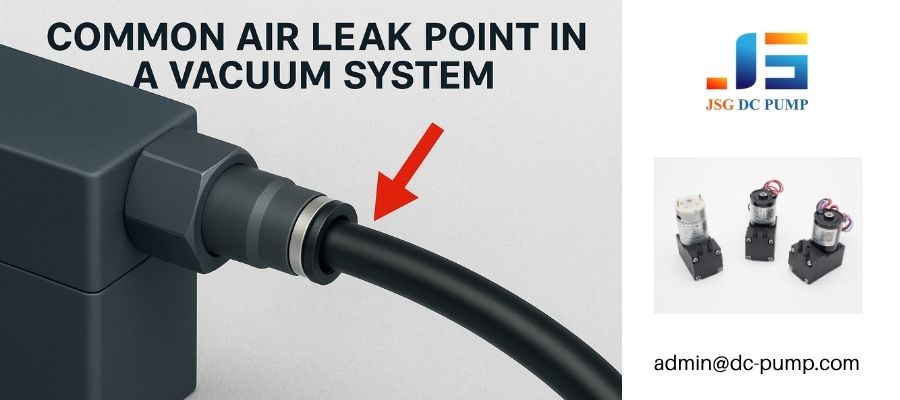
Before a client even opens the pump’s box, I always advise them to pre-test their tubing and vessel for leaks. A vacuum system is only as strong as its weakest seal. You can have the best pump in the world, but it cannot overcome a leaky setup. Think of it like trying to inflate a tire with a hole in it; it’s an impossible task.
A Quick Guide to Leak Detection
Finding a leak requires a methodical approach. Start with the most obvious points and work your way to the less common ones.
- Check All Fittings: Ensure every single tube is pushed all the way into its connector. For threaded fittings, make sure they are tight and sealed with Teflon tape if necessary.
- Inspect the Tubing: Look for cracks, kinks, or collapsed sections in your vacuum lines. A kink not only restricts flow but can also create a small tear.
- Seal the Vessel: Double-check the gaskets and seals on your vacuum chamber or the device your pump is connected to. A worn or misaligned O-ring is a frequent source of leaks.
Isolate the Vacuum Pump DC to Confirm Its Health
The definitive test is to isolate your vacuum pump DC from the rest of the system.
| Test Step | Action | Expected Result if Pump is OK | What it Means if it Fails |
|---|---|---|---|
| 1. Isolate | Disconnect all tubing from the pump’s inlet port. | – | – |
| 2. Connect Gauge | Attach a reliable vacuum gauge directly to the pump’s inlet. | The gauge should quickly pull down to the vacuum level specified on the pump’s datasheet. | The pump itself is faulty or underpowered. |
| 3. Observe | Let it run for a minute. | The vacuum reading should be stable and strong. | The issue is with the pump itself. |
If the pump performs perfectly when isolated, you have 100% confirmation that the problem lies within your external tubing, fittings, or vessel.
Is Your Vacuum Pump DC Actually Rated for Your Target Vacuum?
Your setup is perfectly sealed, but the vacuum level still hits a wall well below your target. You might be asking the pump to do something it was never designed to do.
Every DC vacuum pump has a maximum vacuum rating. If your application requires -90 kPa, but your pump is only specified for -75 kPa, it will never reach your target. Always check the pump’s datasheet and performance curve to ensure its capabilities match your needs.
This is a design-stage mistake I see all too often. An engineer might select a pump based on its flow rate or size, overlooking the maximum vacuum specification. It’s an easy trap to fall into. The “max vacuum” number on a datasheet isn’t just a suggestion; it represents the physical limit of what the pump can achieve under ideal conditions.
Understanding the Performance Curve
The performance curve is the most important tool for selecting the right pump.
- Max Vacuum (Y-axis): This is the highest vacuum the pump can create. At this point, the flow rate is zero. It can hold this vacuum, but it can’t move any more air.
- Max Flow (X-axis): This is the highest flow rate the pump can achieve. This happens at “open flow,” meaning it’s moving a lot of air but creating no vacuum.
Your target vacuum must be at or below the pump’s max vacuum rating.
Key Specification Mismatches
| Mismatch Scenario | Symptom | How to Fix |
|---|---|---|
| Target > Max Vacuum | Pump runs fine but plateaus at its max spec (e.g., -75 kPa). | Select a higher-performance pump model that meets or exceeds your required vacuum. |
| Low Flow at Target | Pump reaches the target vacuum, but very slowly. | Check the performance curve. You may need a pump with a higher flow rate at your target vacuum level. |
| Ignoring the Load | Pump specs are for an empty system, but your application involves pulling through a filter or liquid. | Your “load” increases the required vacuum. You must choose a pump rated significantly higher than the target you see under load. |
Always choose a pump with a maximum vacuum rating at least 10-15% higher than your operational target to provide a safe margin.
Could a Weak Power Supply Be Strangling Your Pump’s Performance?
Your pump seems weak and sluggish, and the motor doesn’t sound like it’s running at full speed. You’ve confirmed the pump model is correct and there are no leaks. The problem could be electrical, not mechanical.
A vacuum pump DC needs stable, sufficient electrical power to perform. If your power supply provides a lower voltage than required or can’t supply enough current, the motor will run slower, directly reducing its ability to generate a strong vacuum.
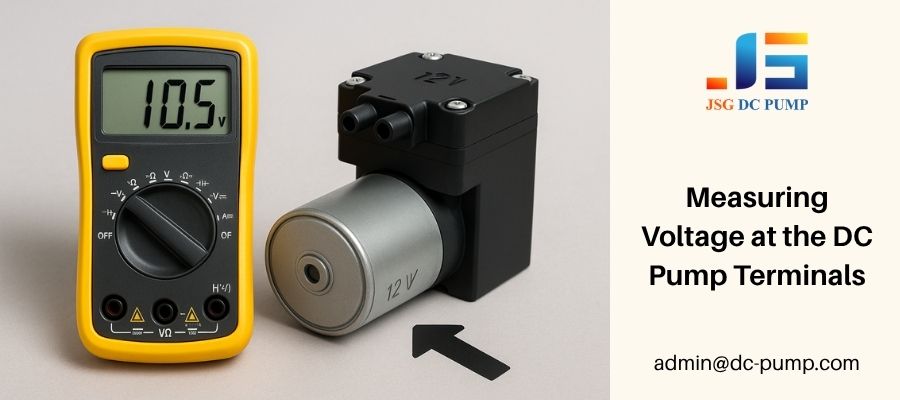
I always remind designers that a pump is an electric motor first and a fluid device second. Just like a car engine needs the right fuel, a DC motor needs the right voltage and current. A common issue is using a long, thin wire to connect the pump, which causes a voltage drop before the power even reaches the motor.
Diagnosing Your Power System
You don’t need to be an electrical engineer to check the basics.
- Check the Voltage Rating: Ensure your power supply’s voltage matches the pump’s rating (e.g., a 12V supply for a 12V pump).
- Measure Voltage Under Load: The most critical test. Use a multimeter to measure the voltage at the pump’s terminals while it is running. A significant drop from the nominal voltage indicates a problem.
- Verify Current Capacity: A power supply is rated in Amps (A). This rating must be higher than the pump’s rated current draw, which you can find on its datasheet. A supply that is too weak in amperage will cause the voltage to sag when the pump is running.
Common Power-Related Pitfalls
| Problem | Symptom | Solution |
|---|---|---|
| Voltage Drop | A 12V pump reads 10V at its terminals when running. | Use shorter, thicker gauge wires. Ensure the power supply itself is regulated and stable. |
| Insufficient Current | Pump struggles or fails to start, especially under load. | Choose a power supply with a higher Amp rating (recommend 1.5x the pump’s rated current). |
| Incorrect Polarity | Pump runs backward (blowing air) or not at all. | Ensure the positive (+) and negative (-) wires are connected to the correct pump terminals. |
A stable power supply is non-negotiable for consistent vacuum performance.
How Does Altitude Affect Your Micro Vacuum Pump’s Performance?
Your pump worked perfectly in the lab at sea level, but now at a higher elevation, it can’t reach the same target vacuum. The pump hasn’t changed, but its environment has.
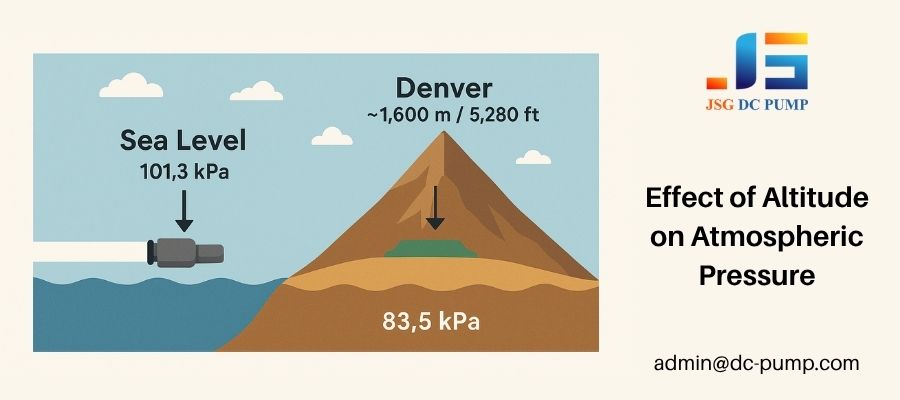
A vacuum pump does not create an absolute vacuum; it creates a pressure differential relative to the surrounding atmosphere. At higher altitudes, the starting atmospheric pressure is lower, which lowers the maximum achievable vacuum level (measured relative to a perfect vacuum).
This is a concept that often surprises people. I worked with a medical device company whose equipment was failing validation tests in their Denver facility. The same devices worked flawlessly in their coastal lab. The issue wasn’t the pumps; it was the physics of atmospheric pressure.
Understanding Pressure and Altitude
Let’s break down the numbers.
- Sea Level: Standard atmospheric pressure is approximately 101.3 kPa (or 14.7 psi). A pump rated for -80 kPa can lower the pressure inside a vessel from 101.3 kPa down to 21.3 kPa.
- High Altitude (e.g., 1,600m / 5,280ft): The atmospheric pressure might only be 83.5 kPa (12.1 psi). That same pump can still only create an 80 kPa pressure differential. This means it can only lower the vessel’s pressure to 3.5 kPa. So while the differential is the same, the absolute final pressure is lower.
Compensating for Altitude
| Altitude | Standard Atmos. Pressure | Max Vacuum of a -80kPa Pump |
|---|---|---|
| Sea Level | ~101.3 kPa | -80 kPa |
| 1,000m (3,280 ft) | ~89.9 kPa | ~-78 to -79 kPa |
| 2,000m (6,560 ft) | ~79.5 kPa | ~-75 to -77 kPa |
| 3,000m (9,840 ft) | ~70.1 kPa | ~-72 to -74 kPa |
The key takeaway is that the pump’s datasheet vacuum rating is typically specified at sea level. If your product needs to operate at high altitudes, you must select a pump with a higher sea-level vacuum rating to compensate for the lower ambient pressure. You can’t troubleshoot this problem away; you must design for it.
Are Clogs or Restrictions in Your Tubing Limiting Your Vacuum?
Your pump is powerful, there are no leaks, and the power is stable. However, the vacuum at the end of your line is weak. The problem might be a simple traffic jam in your tubing.
Any restriction in the air pathway between the pump and your vacuum chamber acts like a bottleneck, reducing the effective performance. This can be caused by using tubing that is too narrow, a clogged filter, or sharp bends that impede airflow.
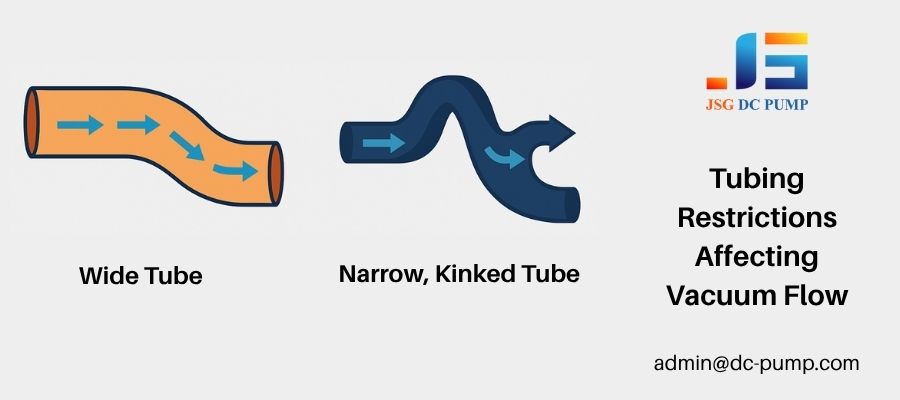
I often use the analogy of a highway. Your micro vacuum pump is the engine of a car, and the tubing is the road. You can have a V8 engine, but if you’re stuck on a single-lane road with a traffic jam, you’re not going to get anywhere fast. The same is true for air flowing through a restrictive tube.
Identifying Flow Restrictions
Think about anything that could slow down the air as it travels to the pump.
- Tubing Diameter: Using a very small inner diameter (ID) tube over a long distance creates significant flow resistance. For longer runs, it’s always better to use a wider tube.
- Inline Components: Filters, check valves, and sensors all add some level of restriction to the system. Ensure they are clean and correctly sized for your required flow rate. A dirty filter is a very common culprit.
- Kinks and Bends: Sharp 90-degree bends in tubing create turbulence and severely restrict airflow compared to a smooth, sweeping curve.
Optimizing Your Air Pathway
| Problem Area | Symptom | How to Optimize |
|---|---|---|
| Narrow Tubing | Vacuum is strong at the pump, but weak at the application end. Takes a long time to pull down. | Use tubing with a larger inner diameter (ID), especially for tubing runs longer than a few centimeters. |
| Clogged Filter | Suction was good initially but has degraded over time. | Inspect and clean or replace all inline filters in the vacuum line. Implement a regular maintenance schedule. |
| Poor Tubing Layout | Tubing has multiple sharp bends or kinks. | Re-route the tubing to use the shortest, straightest path possible with gentle curves instead of sharp angles. |
Clearing these bottlenecks can often restore your system’s performance without ever having to touch the pump itself.
Are Worn Internal Components Preventing Your Pump from Reaching Full Power?
Your vacuum pump dc has been reliable for years, but recently its performance has slowly declined. It’s no longer hitting the deep vacuum it used to, even though the motor sounds fine.
Over time, the flexible diaphragm and the small internal valves of the pump can wear out. The diaphragm may lose its elasticity, and the valves can become stiff or fail to seal perfectly. This gradual wear and tear directly results in a weaker pump that cannot reach its original maximum vacuum.
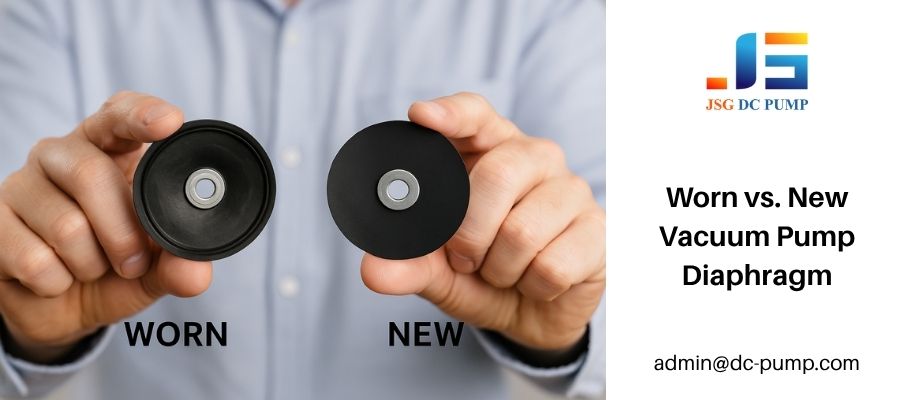
At JSG DC PUMP, we design our products for longevity, but these core components are, by their nature, wear items. They are like the tires on a car. After thousands of hours of constant flexing—millions of cycles—they will eventually need to be replaced to restore the pump to its factory specifications.
The Signs of Internal Wear
Internal wear is different from a sudden failure. It’s a slow decline.
- Gradual Performance Drop: The maximum vacuum the pump can achieve slowly gets worse over months or years of use.
- Increased Time-to-Vacuum: The pump takes longer than it used to to evacuate a chamber to a specific vacuum level.
- Increased Noise: Sometimes, a worn diaphragm or a loose valve can create a slightly different, louder operating sound.
Service and Maintenance
For many high-quality pumps, you don’t need to replace the entire unit.
| Component | Function | Sign of Wear | Solution |
|---|---|---|---|
| Diaphragm | The flexible membrane that moves air. | Loss of elasticity, small tears, or stretching. | Replace the diaphragm. Often available in a service kit. |
| Valves | One-way “flapper” gates that direct airflow. | Debris holding them open, stiffness, or failure to seal flat. | Clean the valve plate. If damaged, replace the valves (usually part of a service kit). |
| Motor Brushes | (In brushed pumps) Conduct electricity to the motor’s armature. | Dust accumulation, worn-down length. | The motor itself is nearing the end of its life. Replace the entire pump unit. |
If your pump has seen heavy use and its performance is fading, investing in a simple repair kit can often be a cost-effective way to bring it back to its original performance level.
Conclusion
Failing to reach a target vacuum is often a system-level issue, not a pump failure.
By methodically checking for leaks, verifying specifications and power, and ensuring a clear pathway, you can solve most problems efficiently and prevent unnecessary downtime.
At JSG DC PUMP, we specialize in helping OEM engineers and manufacturers achieve stable, reliable vacuum performance through precision-engineered DC vacuum pumps and expert integration support.
If you need assistance diagnosing or optimizing your pump system, contact us anytime at 📩 admin@dc-pump.com — our technical team is ready to help you find the best solution for your application.