You’ve run your DC vacuum pump and hit your target vacuum level. But as soon as you turn the pump off, the pressure starts to creep back up, ruining your process.
To hold vacuum pressure, you must first create a perfectly sealed system using proper fittings and materials. Then, use components like check valves or solenoid valves to isolate the vacuum from the pump and prevent any back-leakage.
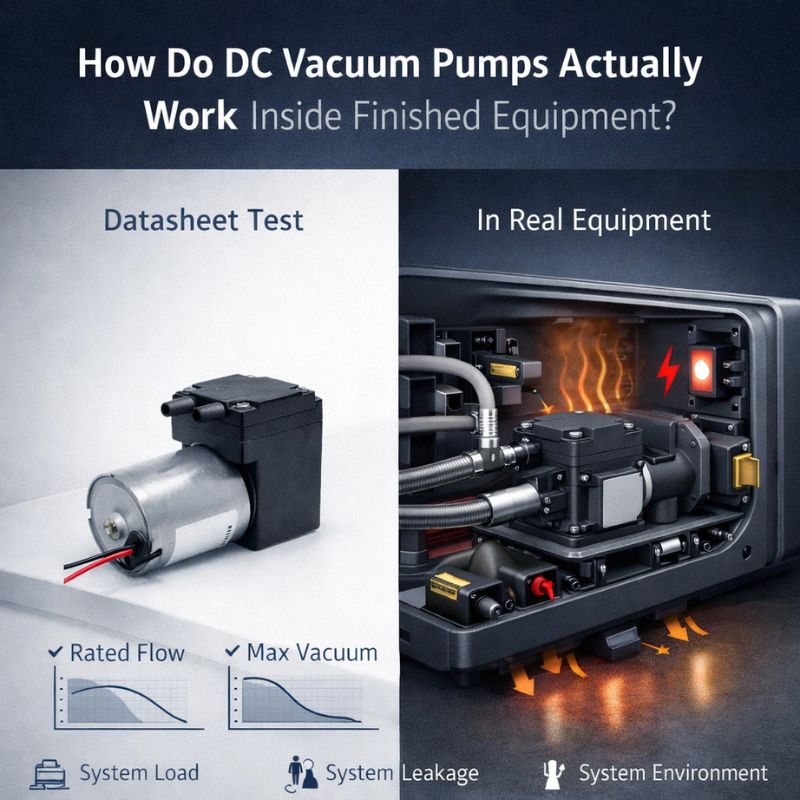
As an engineer at JSG DC PUMP for over two decades, I can tell you that a pump’s job is to create a vacuum, not necessarily to hold it. The pump itself has internal pathways that can be a source of a slow leak when it’s off. Holding a stable vacuum is a function of the entire system design. I’ve seen countless brilliant projects fail because of tiny, overlooked details in the system. The good news is that these details are easy to fix once you know where to look. Let’s walk through the most effective methods to make your vacuum last.
Are your fittings and connections truly airtight?
You’ve pushed the tubing onto the pump and your device, but the vacuum bleeds away quickly. You are sure the pump is strong enough for the job.
The most common reason for vacuum loss is leaking connections. Every fitting, joint, and connection point is a potential failure point that can allow atmosphere to leak back into your system.
Think of your vacuum system like a bucket of water. The pump does the work of emptying the bucket, but even a pinhole leak will eventually let all the water (or in this case, air) back in. Air will always try to equalize pressure, and it will exploit the weakest point. At JSG, our first question to a customer with holding issues is always about the fittings.
Common Fitting Problems and Solutions
| Fitting Type | Common Problem | Solution |
|---|---|---|
| Barbed Fittings | Using the wrong size or type of tubing. The tube is too loose or too hard to create a good seal. | Use soft, pliable tubing (like silicone) that is slightly smaller than the barb. Secure it with a small zip-tie or hose clamp for a perfect seal. |
| Push-to-Connect | Scratches on the tubing surface from repeated use prevent the internal O-ring from sealing. | Cut the end of the tube cleanly before inserting. If it still leaks, replace that section of tubing. Never use a scratched tube. |
| Threaded Fittings | The threads themselves do not create a seal. Air can spiral through the gaps. | Use a thread sealant. For vacuum, PTFE (Teflon) tape is a great choice. Wrap it 2-3 times in the direction of the threads. |
Could your tubing be the source of the leak?
Your fittings are all perfectly sealed, but you are still losing vacuum over time. You can’t find any obvious leaks at the connection points.
The material of your tubing itself can be permeable to air. Some plastics and rubbers allow gas molecules to pass directly through the tube walls, a process called permeation, which slowly ruins a deep vacuum.
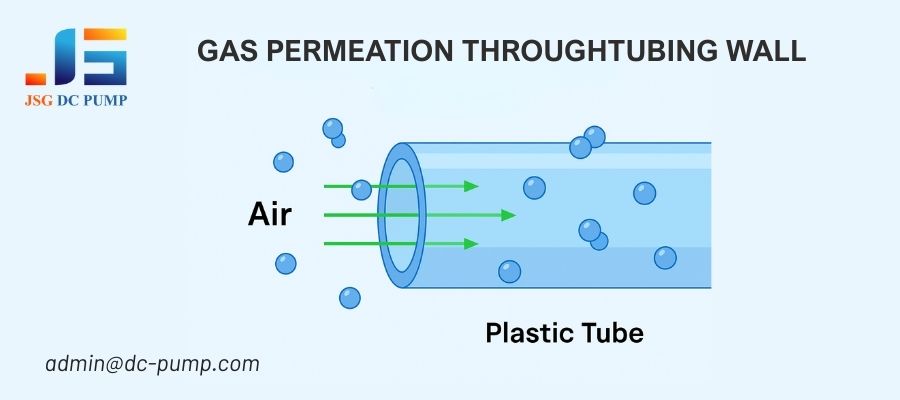
This is a problem that often mystifies people. They spend hours leak-checking fittings when the tube itself is the culprit. For a light vacuum, standard vinyl or silicone tubing is often fine. But if you need to hold a deep vacuum for a long time, material choice becomes critical. Harder, more rigid materials are generally less permeable than soft, flexible ones. I learned this the hard way on a project that required holding a vacuum for 24 hours; we switched from silicone to a specialized polyurethane tubing and the problem was solved instantly.
Tubing Material Comparison for Vacuum
| Tubing Material | Permeability | Flexibility | Best Use Case |
|---|---|---|---|
| Silicone | High | Very High | Short-term applications where flexibility is key. |
| PVC (Vinyl) | Medium | High | General purpose, light-duty vacuum applications. |
| Polyurethane | Low | Medium | Good for holding vacuum where some flexibility is still needed. |
| Nylon / Metal | Very Low | Low | Best for deep, long-term vacuum; “hard plumbing.” |
Is your pump’s internal valve working correctly?
You have a perfect, leak-free system, but the vacuum pressure seems to leak back through the pump as soon as you turn it off.
A dirty or worn internal pump valve will fail to seal properly. This allows the vacuum in your system to pull air backward through the pump head, quickly equalizing the pressure.
The valves inside your diaphragm pump are the heart of its operation. They are simple, one-way flaps that direct airflow. On the final stroke, the outlet valve closes to prevent air from being sucked back into the pump chamber. However, these valves are not designed to be perfect, long-term seals. A tiny piece of dust, debris, or even moisture can get lodged under the valve, holding it slightly open. While this may not noticeably affect performance while the pump is running, it creates a clear leak path the moment the pump stops. This is why you cannot rely solely on the pump’s internal valves to hold a critical vacuum.
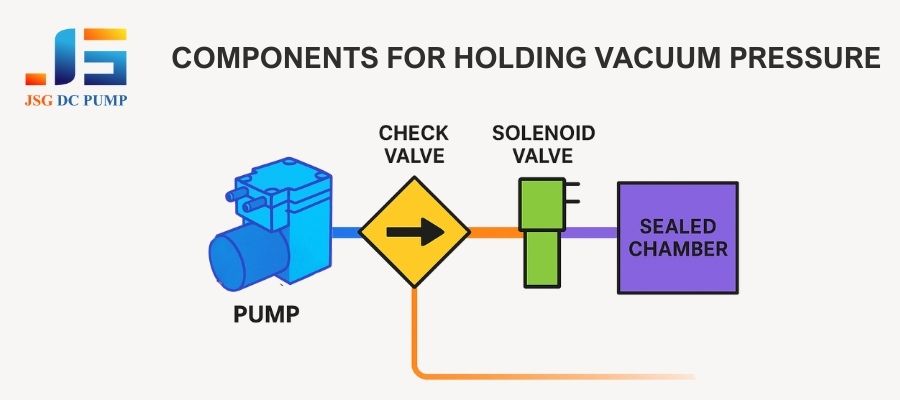
Have you installed a dedicated check valve?
You need to hold the vacuum, but you don’t want the complexity of an electronic system. You need a simple, automatic solution.
Installing a high-quality external check valve is the simplest way to hold a vacuum. This one-way valve automatically closes when the pump stops, isolating your system from the pump.
A dedicated check valve is your first line of defense. Think of it as a much more reliable version of the pump’s internal valves. You should install it in the vacuum line, as close to your vacuum chamber or device as possible. When the pump is running, the suction pulls the valve open. When the pump turns off, the vacuum you’ve created in the system physically holds the check valve shut, preventing any air from leaking back from the pump side. It’s a purely mechanical and automatic solution. For many of our clients’ applications, this is the only component they need to add to achieve a stable, lasting vacuum.
Key Check Valve Considerations
- Cracking Pressure: Choose a valve with a very low “cracking pressure.” This is the amount of suction needed to open it, and a low value ensures your pump’s power isn’t wasted.
- Seal Material: Ensure the valve’s seal material (often EPDM or FKM) is compatible with any gases in your system.
Are you using a solenoid valve to isolate the system?
You need precise, instant control over when the vacuum is held and when it is released. A passive check valve isn’t responsive enough for your application.
A normally-closed solenoid valve provides active, electronically-controlled isolation. When de-energized, it creates a guaranteed seal, and when energized, it opens the path for the pump to work.
A solenoid valve is the professional’s choice for automated systems. You install it between the pump and your vacuum chamber. Here’s a typical operation: To create a vacuum, you power on both the pump and the solenoid valve. The valve opens, allowing the pump to evacuate the chamber. Once you reach your target vacuum, you de-energize the solenoid valve. It snaps shut, creating a positive, leak-proof seal.
You can then turn off the pump to save power and reduce noise, and the vacuum will be held perfectly by the solenoid. This method offers the best sealing performance and is essential for applications like vacuum pick-and-place machines where you need to grip and release objects on command. Be sure to wire the solenoid and pump correctly so they operate in the proper sequence.
Could a vacuum reservoir stabilize your system?
Your vacuum level fluctuates too much, or a tiny leak causes the pressure to drop too quickly. You need more stability and a buffer against small leaks.
Adding a vacuum reservoir (or accumulator) to your system increases its total volume. This makes the vacuum level far more stable and less susceptible to the effects of tiny leaks.
A vacuum reservoir is simply a small, rigid, sealed container plumbed into your vacuum line. Its purpose is to increase the total internal volume of your system. Imagine trying to empty the air from a thimble versus emptying the air from a large jar. A small leak into the thimble will raise the pressure almost instantly.
That same small leak into the large jar will barely have a noticeable effect over the same time period. That’s the principle of a reservoir. It acts as a buffer. It won’t stop leaks, but it dramatically slows down their impact, giving your system robust stability. I often recommend this for applications with many fittings or complex geometries where eliminating every single microscopic leak is nearly impossible.
Are your materials outgassing and raising the pressure?
You have a perfect, leak-free metal system, but after reaching a deep vacuum, the pressure slowly starts to rise all on its own, even with the pump isolated.
Outgassing is when molecules trapped inside materials (especially plastics, rubbers, and epoxies) are released into the vacuum. This process can be the ultimate limiting factor in achieving a deep, stable vacuum.
This is an advanced concept that trips up many engineers aiming for high vacuum levels. You’ve created a near-perfect vacuum, and now the internal pressure is lower than the vapor pressure of the materials themselves. Water molecules, solvents, and other trapped volatile compounds will begin to “boil” off the surfaces and out of the bulk material, releasing gas and raising the pressure inside your chamber.
This is not a leak from the outside; it’s the system “leaking” into itself. For high-vacuum applications, it’s critical to select materials specifically rated for vacuum service, such as stainless steel, glass, and certain polymers like PEEK or FKM. Avoid porous materials and general-purpose plastics if you need to hold a deep vacuum.
Have you minimized the internal volume of your system?
Your pump seems to run forever to reach the target vacuum, and any leak, no matter how small, has a huge and immediate impact on the pressure.
The smaller the total internal volume of your system, the faster your pump will work and the more stable your vacuum will be. Unnecessarily long tubes are a primary cause of excessive volume.
This is a simple application of physics that is surprisingly easy to overlook. Your pump has to remove all the air from inside your system. If your system consists of long, looping tubes, you are forcing the pump to do a lot of extra work. Every inch of tubing adds volume that needs to be evacuated.
Here’s my advice: keep your tubing as short and as direct as possible. Mount the pump close to the chamber or device it’s evacuating. This simple change has two huge benefits. First, your pump will achieve its target vacuum much faster. Second, it reduces the surface area available for permeation and minimizes the impact of any tiny leaks, directly following the same principle as a vacuum reservoir. It’s the cheapest and easiest optimization you can make.
Are your system seals and O-rings in good condition?
The device you are creating a vacuum in has its own lid or access panels with seals. You’ve checked all external tubes, but the vacuum won’t hold.
Aged, cracked, or dirty O-rings and gasket seals within your primary vacuum chamber are a major source of leaks. These seals degrade over time and must be considered a maintenance item.
Many engineers I work with focus so much on the pump and the tubing that they forget to inspect the seals on their actual device. If you’re pulling a vacuum on a chamber with a removable lid, that lid’s gasket is the largest seal in your entire system and therefore the most likely failure point. Over time, these seals can become compressed and flat (“compression set”), or they can develop microscopic cracks from age and chemical exposure.
A common mistake is to overtighten a lid, which can damage the O-ring and actually create a leak path. Always inspect your primary system seals. They should be clean, pliable, and free of any visible nicks or damage. If a seal looks old and flat, replace it. It’s a cheap part that can save you days of troubleshooting.
Is the pump powerful enough for your target vacuum?
You’ve done everything right—your system is sealed perfectly—but the pump can’t reach the vacuum level you need, or it can’t overcome even a tiny leak.
Every vacuum pump has a maximum “ultimate vacuum” rating. If your required vacuum level is too close to this limit, the pump will have no reserve power to overcome system leaks.
It’s critical to choose a pump that is significantly more powerful than your minimum requirement. For example, if your application requires a stable vacuum of -75 kPa, choosing a pump with a maximum vacuum rating of -80 kPa is a recipe for failure. Why? Because that -80 kPa rating is achieved under ideal laboratory conditions with zero leaks. In the real world, your system will always have some amount of microscopic leakage.
You need a pump with enough reserve capacity to remove leaking air faster than it enters. As a rule of thumb, I advise our customers to select a pump with an ultimate vacuum at least 15-20% deeper than their target operating vacuum. This ensures the pump can easily reach and maintain the required pressure, even in a non-perfect system.
Conclusion
Holding a vacuum is a system-level challenge. Success depends on airtight connections, proper materials, strategic use of valves, and intelligent system design. The pump provides the power, but the system preserves it.
If you need a reliable DC vacuum pump solution designed for long-term vacuum holding and OEM integration,
contact JSG DC PUMP today at admin@dc-pump.com – your trusted partner in precision vacuum systems.