

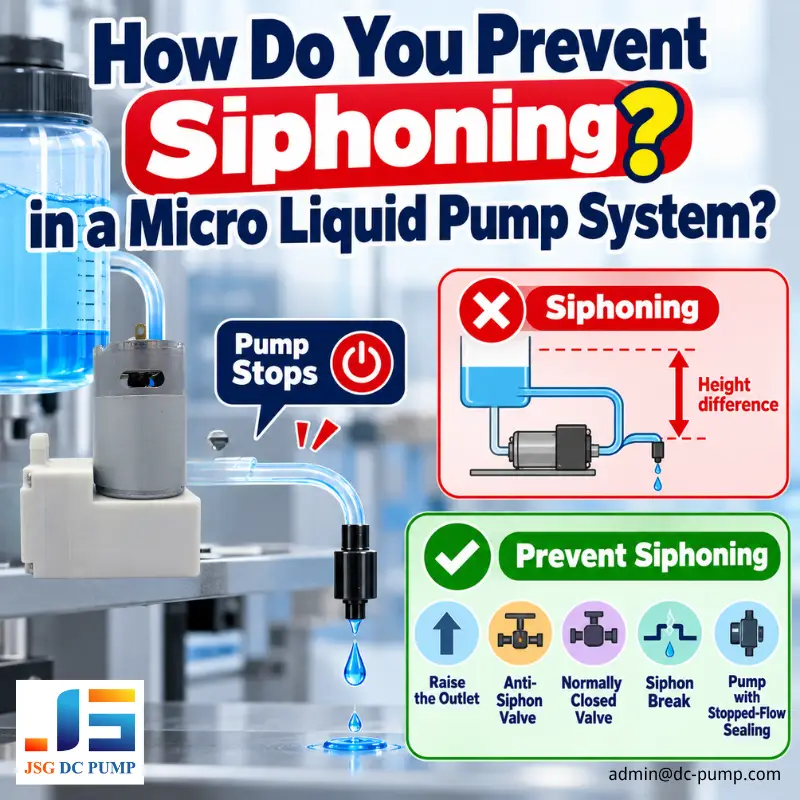
The micro liquid pump stops on schedule, but the nozzle does not. Another drop forms and falls. In a dosing machine, even a small amount of extra liquid can affect the final delivered volume. The problem may not be the pump itself.
To prevent siphoning, change the height difference between the reservoir and outlet, break the continuous liquid column, or install a suitable anti-siphon or shutoff valve. The right choice depends on the liquid circuit and acceptable leakage.
Why Does Siphoning Continue After a Micro Liquid Pump Stops?
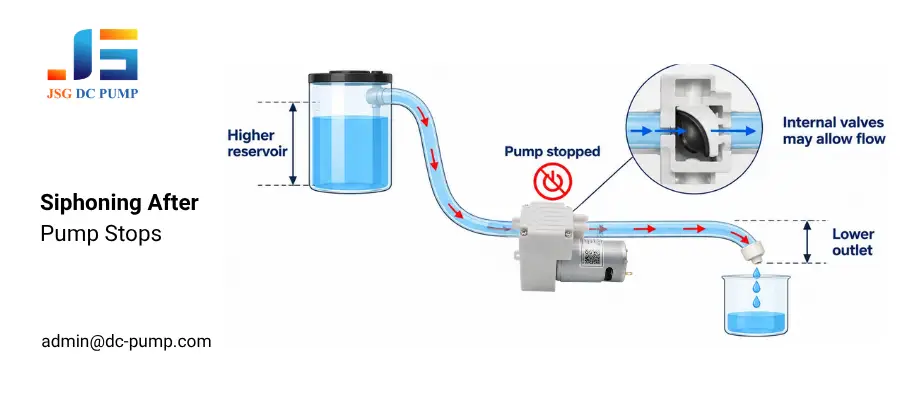
A dispenser with its reservoir above the nozzle may keep dripping after the motor stops. Replacing the pump immediately could miss the real cause: liquid is still connected through a filled tube to a lower outlet.
Siphoning continues because the height difference between the source liquid surface and the outlet produces a pressure difference. When both ends are exposed to atmospheric pressure, gravity can drive liquid through a primed circuit without motor power.
Whether that liquid passes through the stationary pump depends on its internal structure. Some valves prevent reverse flow but offer little resistance in the forward direction. Even an elevated tubing loop may not help if the line stays filled and the outlet remains lower.
How Can You Identify Siphoning in a Micro Liquid Pump System?
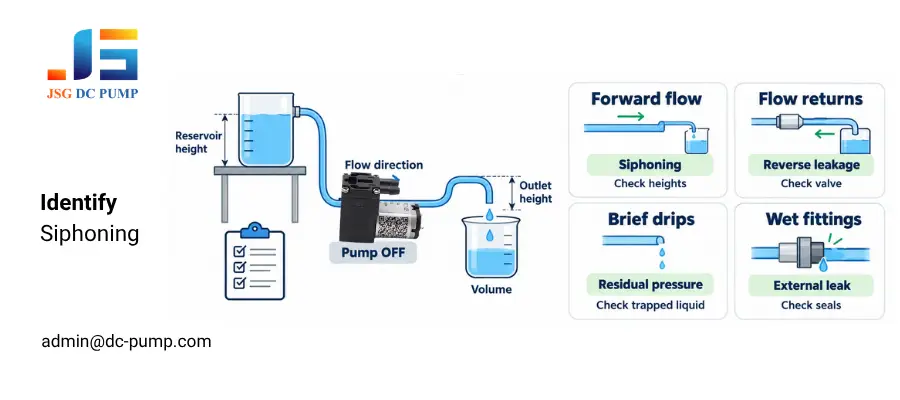
A wet nozzle does not automatically mean siphoning. Flexible tubing can release stored pressure, and liquid trapped inside a nozzle may simply drain out. These problems can look identical during the first few seconds after shutdown.
To identify siphoning, observe the flow direction and change the reservoir liquid level. If forward discharge continues and becomes stronger as the source level rises relative to the outlet, hydrostatic pressure is a likely cause.
Collect the discharged liquid over a fixed period rather than counting drops. Keep the tubing primed and change only one variable at a time. Otherwise, it becomes difficult to determine what actually caused the difference.
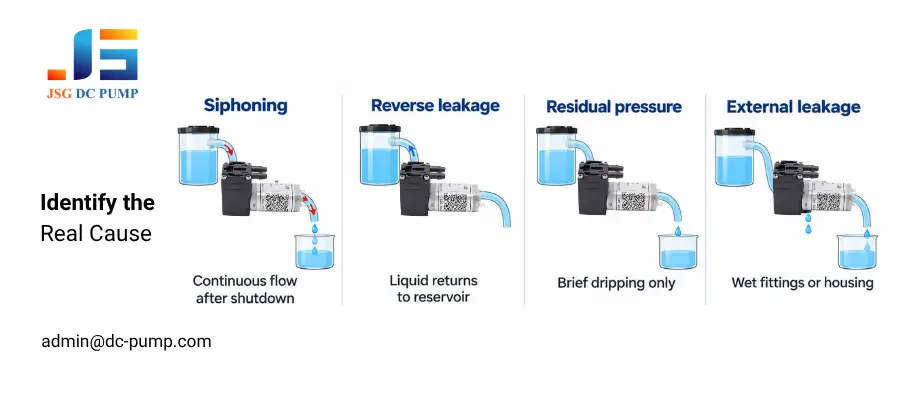
| Symptom | Possible Cause | Check |
| Continuous forward discharge | Siphoning | Reservoir level and outlet height |
| Liquid returns to reservoir | Reverse leakage | Valve sealing and orientation |
| A few drops, then dry | Residual pressure or nozzle drainage | Trapped liquid volume |
| Wet fittings or housing | External leakage | Connections and seals |
What Are 5 Practical Ways to Prevent Siphoning?
Adding a valve may seem like the obvious solution, but it also introduces resistance and another component that can fail. In some equipment, changing the outlet position is enough to remove the driving force.
There are five practical approaches: raise the outlet, install an anti-siphon valve, add a normally closed shutoff valve, interrupt the liquid column, or choose a pump with verified stopped-flow sealing.
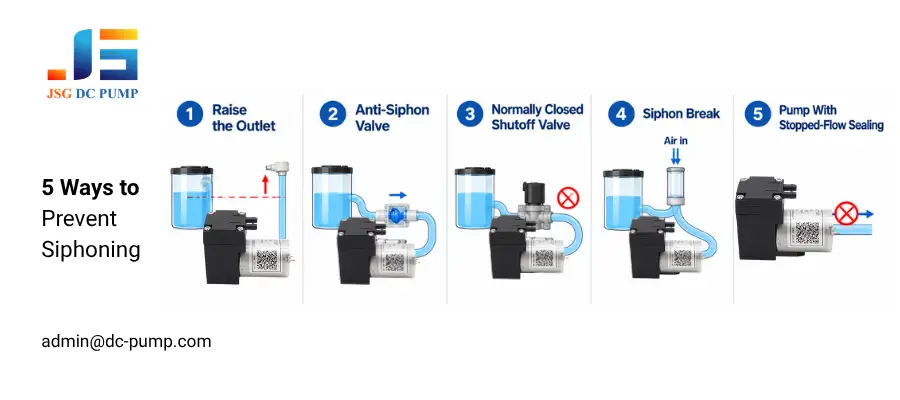
The choice depends on the application. A siphon break may introduce unwanted air, while a spring-loaded valve requires pressure to open. Consider how the system operates before deciding.
1. Raise the Outlet: Keep the discharge opening above the highest permitted reservoir liquid level where practical. Simply moving the pump higher will not achieve the same result.
2. Install an Anti-Siphon Valve: Select a valve that resists gravity-driven flow after shutdown but opens at the required working pressure.
3. Add a Normally Closed Shutoff Valve: Close the liquid path when pumping ends. Check its leakage rating and behavior during power failure.
4. Use a Siphon Break: Interrupt the liquid column with a suitable air gap, provided air entry does not create contamination or priming problems.
5. Verify Stopped-Flow Sealing: Some pump mechanisms provide better isolation than others. Confirm their performance using the actual liquid and installation.
Which Anti-Siphon Valve Should You Choose for a Micro Liquid Pump?
A standard check valve can look like the simplest solution. However, it may prevent reverse flow while still opening under gravity in the normal delivery direction. This is why some systems continue dripping even after a check valve is installed.
Choose an anti-siphon valve with an opening pressure above the maximum unwanted differential pressure, while ensuring the pump can still deliver its required flow. A normally closed solenoid or pinch valve may be more suitable when controlled isolation is necessary.
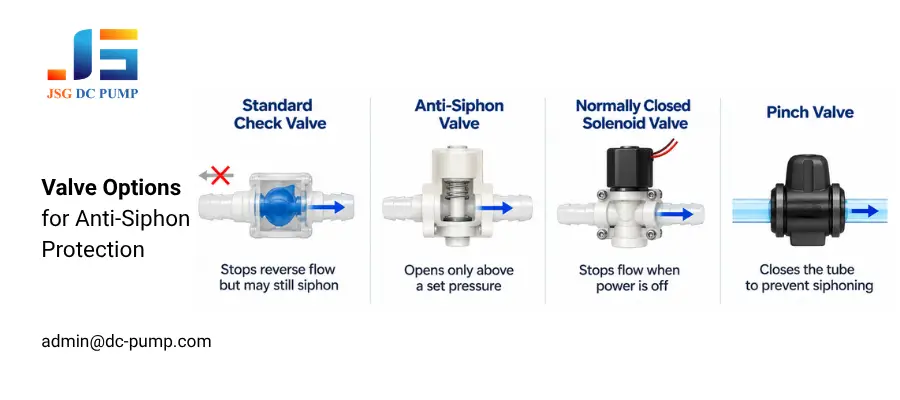
Consider a water reservoir with its liquid surface 0.5 m above an atmospheric outlet. That height difference produces approximately 4.9 kPa of hydrostatic pressure. Valve selection must also account for fluid density, tolerances, and other pressure sources. See TACMINA’s anti-siphon valve guide for further technical information.
How Do You Maintain Flow After Adding Protection?
The nozzle may finally stop dripping, but the dispenser now takes longer to deliver the same volume. This can happen when the anti-siphon valve adds more resistance than the pump can comfortably overcome.
To maintain flow, evaluate the pump’s actual operating point with the protective valve installed. Include the production tubing, filters, and outlet restrictions. Free-flow specifications alone cannot predict the assembled system’s performance.
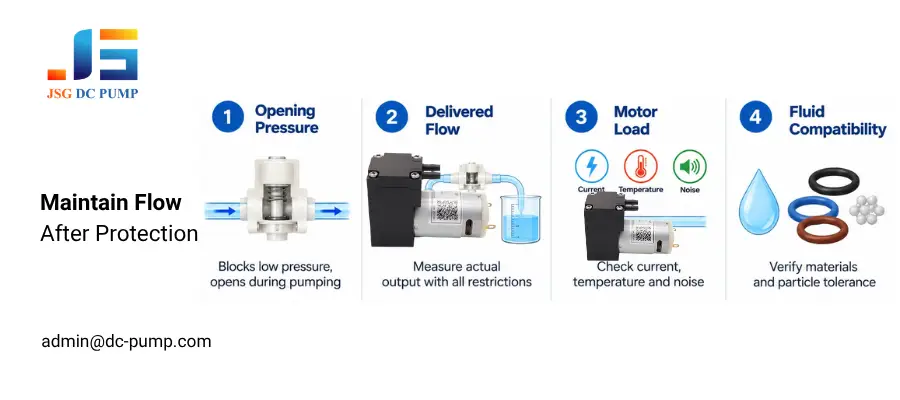
Four measurements are particularly useful before approving the design:
1. Opening Pressure: Check that the valve blocks unwanted static pressure without exceeding the pump’s available pressure at working flow.
2. Delivered Flow: Measure the actual volume transferred during a normal operating cycle.
3. Motor Load: Compare current, temperature, and noise before and after adding the valve.
4. Fluid Compatibility: Test with the intended liquid. Deposits and seal swelling may change valve behavior over time.
How Should OEM Engineers Test the Finished System?
A short tube on a laboratory bench is useful for initial testing. But the finished machine may have longer tubing, a higher reservoir, or a nozzle mounted much lower than expected. Any of these differences can change shutdown behavior.
OEM engineers should test the final circuit at the greatest expected hydrostatic pressure difference, measuring both unwanted discharge and normal delivery performance. The protection must stop liquid when required without preventing reliable restarting.
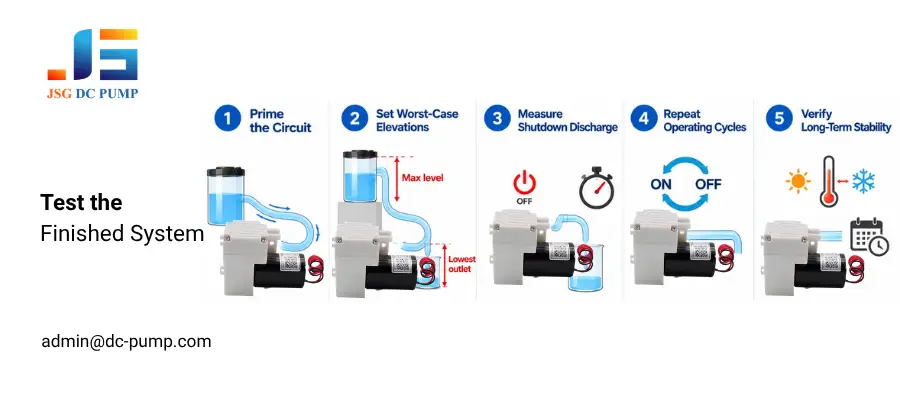
Set an acceptable leakage limit first, expressed as liquid volume over a defined standby period. Then follow these steps:
1. Prime the Circuit: Fill the tubing completely and run the pump at its normal working point.
2. Set Worst-Case Elevations: Use the highest permitted liquid level and lowest allowed outlet position.
3. Measure Shutdown Discharge: Stop the pump and collect any liquid released during the specified interval.
4. Repeat Operating Cycles: Test normal shutdowns, restarts, and power interruptions. Watch for priming difficulties.
5. Check Long-Term Stability: Repeat measurements after representative temperature changes, fluid exposure, and component aging.
Conclusion
Stopping a micro liquid pump does not always stop liquid movement. Preventing siphoning requires the right tubing arrangement, suitable flow protection, and testing under actual operating conditions. The selected solution must control unwanted discharge without reducing the required working flow.
If your equipment has siphoning problems, JSG can help evaluate suitable micro liquid pump options. Send your fluid type, tubing layout, required flow, and allowable shutdown leakage to admin@dc-pump.com to discuss your application.
